Quick start for CueNIMBY
Get started with CueNIMBY workstation control
CueNIMBY is a Qt-based cross-platform system tray application that provides user control over OpenCue’s NIMBY (Not In My Back Yard) feature on workstations. It features professional icons with the OpenCue logo, emoji hints (🔒❌⚠️🔧) for quick status recognition, and enhanced status detection. It allows artists and users to monitor their machine’s rendering availability, toggle between available and disabled states, receive notifications when jobs start, launch CueGUI directly from the tray, and schedule automatic state changes. CueNIMBY starts even when CueBot is unreachable and reconnects automatically.
Before you begin
You must have the following software installed on your machine:
- Python version 3.7 or greater
- The Python
pipcommand- On some systems this command may be installed as
pip3
- On some systems this command may be installed as
- Qt for Python (PyQt6 or PySide6) - automatically installed with CueNIMBY
- OpenCue client libraries (pycue)
- Access to a running Cuebot server (CueNIMBY will start even if CueBot is unreachable and reconnect automatically)
Platform-specific requirements
macOS:
- macOS 10.14 or later
- Optional but recommended:
terminal-notifierfor most reliable notifications (brew install terminal-notifier) - Alternative:
pyncfor enhanced notifications (pip install pync) - Built-in fallback: osascript (no additional install required)
Windows:
- Windows 10 or later
- Optional:
win10toastfor toast notifications
Linux:
- A desktop environment with system tray support
- Notification daemon (usually pre-installed)
- Optional:
notify2for desktop notifications
Installing CueNIMBY
From source
-
Clone or download the OpenCue repository:
git clone https://github.com/<username>/OpenCue.git cd OpenCue -
Install CueNIMBY:
cd cuenimby
pip install .
Using the sandbox installer
If you’re using the OpenCue sandbox environment, CueNIMBY is automatically installed when you run:
./sandbox/install-client-sources.sh
Running CueNIMBY
-
Start CueNIMBY from the command line:
cuenimbyOn first run, CueNIMBY creates a configuration file at
~/.opencue/cuenimby.json. - Look for the CueNIMBY icon in your system tray (professional icons with OpenCue logo):
- 🔄 Starting (
opencue-starting.png): Application is initializing - 🟢 Available (
opencue-available.png): Host is idle and ready for rendering - 🔴 Working (
opencue-working.png): Currently rendering frames (red dot in center) - 🔴 Disabled (
opencue-disabled.png): Manually locked, NIMBY locked, or host down - ❌ Error (
opencue-error.png): CueBot unreachable or machine not found on CueBot - ⚠️ Warning (
opencue-warning.png): Host ping above 60 second limit - 🔧 Repair (
opencue-repair.png): Host is under repair - ❓ Unknown (
opencue-unknown.png): Unknown status
macOS - Available status:
Windows - Available status:
Icon Gallery:
Icon File Description 
opencue-available.pngGreen - Ready for rendering 
opencue-working.pngIcon with red dot in center - Currently rendering 
opencue-disabled.pngRed - Locked/disabled 
opencue-error.pngRed X - Error/unreachable 
opencue-warning.pngYellow - Warning/lagging 
opencue-repair.pngOrange - Under repair 
opencue-starting.pngGray - Initializing 
opencue-unknown.pngGray ? - Unknown 
opencue-default.pngDefault fallback - 🔄 Starting (
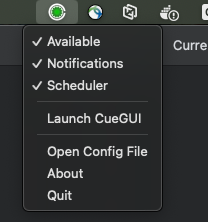
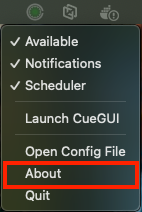
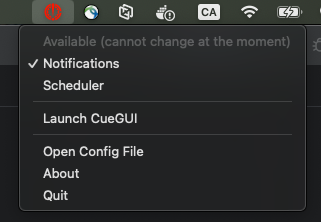
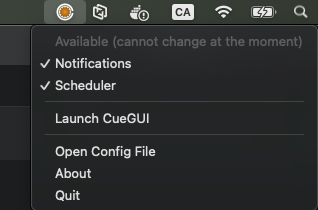
- Right-click the tray icon to access the menu:
- Toggle Available to enable/disable rendering (disabled when CueBot is unreachable or host not found)
- Toggle Notifications to control desktop alerts
- Toggle Scheduler for time-based control
- Launch CueGUI to open CueGUI application directly (disabled when CueGUI is not available)
- Open Config File to edit configuration in your default editor
- About to view CueBot address, monitored host, and version information
macOS - CueNIMBY menu:
Connecting to Cuebot
By default, CueNIMBY connects to localhost:8443. To connect to a different Cuebot server:
Using command-line arguments
cuenimby --cuebot-host cuebot.example.com --cuebot-port 8443
Using environment variables
export CUEBOT_HOST=cuebot.example.com
export CUEBOT_PORT=8443
cuenimby
Using configuration file
Edit ~/.opencue/cuenimby.json:
{
  "cuebot_host": "cuebot.example.com",
  "cuebot_port": 8443
}
Testing the setup
- With CueNIMBY running, verify your host appears in CueGUI:
- Open CueGUI or CueCommander
- Navigate to the Hosts view
- Find your workstation by hostname
- Test manual control:
- Right-click the CueNIMBY tray icon
- Uncheck Available to disable rendering
- Check Available to re-enable rendering
- Observe the icon color change and notification
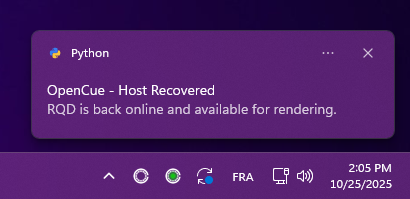
- Test job notifications:
- Submit a test job to OpenCue
- When a frame starts on your workstation, you should receive a notification
Troubleshooting
CueNIMBY won’t start
- Check that Python 3.7+ is installed:
python --versionorpython3 --version - Verify OpenCue client libraries are installed:
pip list | grep pycue - Check the logs for errors: Run with
cuenimby --verbose
Can’t connect to Cuebot
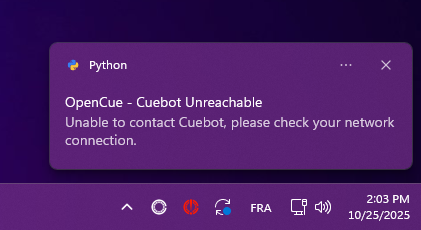
CueNIMBY will now start even when CueBot is unreachable and display a clear error status (❌).
macOS - Connection error:
Windows - Connection error:
- Check the tray icon tooltip for specific error message
- Verify Cuebot is running and accessible
- Check firewall rules allow gRPC traffic on the Cuebot port
- Test connectivity:
telnet cuebot.example.com 8443 - Verify hostname and port in
~/.opencue/cuenimby.json - Run with
--verboseto see detailed connection errors - CueNIMBY will automatically reconnect when CueBot becomes available
Tray icon doesn’t appear
- Linux: Ensure your desktop environment supports system tray icons
- Some environments require Qt6 and system tray support
- Try restarting CueNIMBY after logging in
Host not found
If you see “❌ Machine not found on CueBot, check if RQD is running”:
- Verify RQD is running on your machine:
ps aux | grep rqd(macOS/Linux) - Check RQD logs for connection errors
- Verify hostname matches in CueBot (check CueGUI > Monitor Hosts)
- Use
--hostnameflag to specify exact hostname:cuenimby --hostname your-host-name - Ensure RQD successfully registered with CueBot
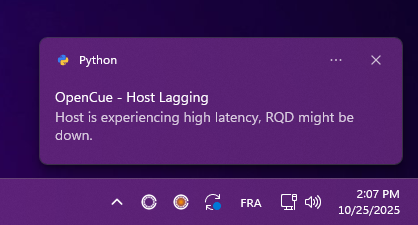
Host lagging
If you see “⚠️ Host ping above limit” warning:
macOS - Host lagging:
Windows - Host lagging:
- Check if RQD is still running:
ps aux | grep rqd - Verify network connection stability
- Review RQD logs for connection issues
- Consider restarting RQD if problem persists
- Check CueBot server load
Host under repair
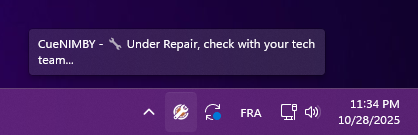
If you see “🔧 Under Repair” status:
macOS - Under repair:
Windows - Under repair:
- Contact your technical team for repair status
- Host has been administratively marked for maintenance
- No rendering will occur until repair state is cleared
- Check with system administrators for estimated resolution
No notifications
- macOS: Grant notification permissions in System Preferences. For best results, install terminal-notifier:
brew install terminal-notifier - Windows: Check notification settings in Windows Settings
- Linux: Ensure notification daemon is running:
ps aux | grep notification