Using Filters
Overview
This guide shows you how to create, configure, and manage filters in OpenCue using CueGUI. Filters automate job configuration, resource allocation, and workflow policies by automatically applying actions when jobs match specified criteria.
Prerequisites
Before working with filters, ensure you have:
- CueGUI installed and configured
- Administrator or pipeline engineer access
- Basic understanding of OpenCue concepts (jobs, layers, groups)
- Knowledge of your facility’s job naming conventions
Accessing the Filters Plugin
Step 1: Launch CueGUI
cuegui &
Step 2: Open CueCommander
- Click Window in the menu bar
- Select Open Windows: CueCommander
- The CueCommander window opens
Step 3: Access Filters Plugin
- In CueCommander, locate the plugin panel
- To open the Filters Windows:
- Click Views/Plugins in the menu bar
- Select OpenCuecommander > Monitor Cue
- To open the Filters Windows:
- Click on Filters plugin tab
- The filters management interface displays
- Access Filters
- In CueCommander > Monitor Cue, find the Show (Root Group tree) on the top-left side
- Right-click on a show name (e.g., “testing”, “demo-show”, “production-show”)
- Select “View Filters…” from the context menu
- Filter Dialog Opens
- You’ll see a dialog titled “Filters for: [show-name]”
- The interface has three main sections:
- Left: Filter list
- Top right: Matchers
- Bottom right: Actions
Interface Components:
- Filter List (left): Shows all configured filters
- Matchers (top right): Conditions for filter
- Actions (bottom right): Operations to execute
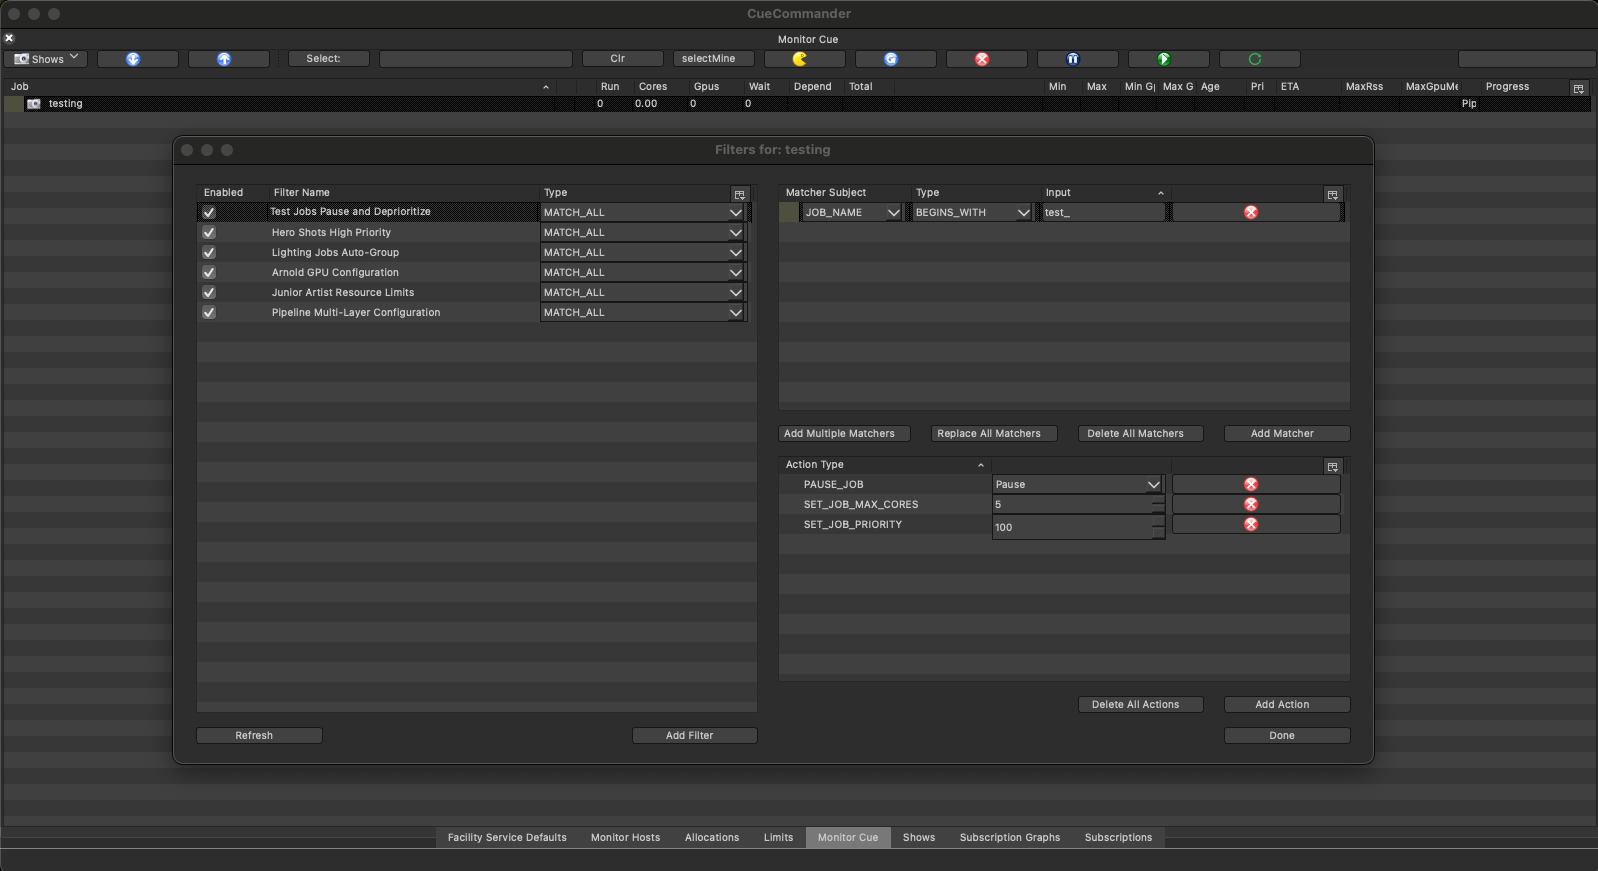
Figure: The Filters management interface in CueCommander showing the filter list (left), matcher configuration (top right), and action configuration (bottom right). In this example, the “Test Jobs Pause and Deprioritize” filter is selected, showing a matcher that matches job names beginning with “test_” and three actions to pause the job, limit cores, and set priority.
Creating Your First Filter
Let’s create a simple filter that automatically groups all lighting jobs.
Step 1: Create New Filter
- Click Add Filter button
- Add filter dialog appears
Step 2: Configure Filter Properties
Fill in the filter properties:
Filter Name:
Lighting Jobs Auto-Group
Click OK to create the filter.
Filter Type:
- Select: MATCH_ALL (all matchers must match)
Order:
Right click on the new filter and select Set Order… to set the order.
10
Lower numbers execute first
Enabled:
- Check the box to enable the filter
Step 3: Add a Matcher
Now define when this filter should trigger:
- Select your new filter in the list
- Click Add Matcher button
- Create Matcher dialog appears
Select the type of item to match:
- Select
JOB_NAME - Click OK
Select the type of match to perform:
- Type: Select
BEGINS_WITH - Click OK
Enter the string to match:
- Input: Enter
light_ - Click OK
What this means: The filter will match any job whose name starts with “light_”
Step 4: Add an Action
Define what happens when the matcher succeeds:
- With your filter selected, click Add Action
- Create Action dialog appears
Select the type of action to add:
- Select
MOVE_JOB_TO_GROUP - Click OK
What group should it move to?
- Select
lighting-group
Important: What are Groups?
Groups are organizational folders for managing jobs in OpenCue. Before using this action, you must create the target group:
To Create a Group:
- In CueCommander > Monitor Cue
- Right-click on your show name in the Show/Root Group tree
- Select “Create Group…“
- Enter name:
lighting-group - Click OK
Groups allow you to organize jobs by department, priority, or any other category for better tracking and resource management.
Step 5: Test the Filter
- Submit a test job named
light_test_shot_001 - Watch the Monitor Jobs plugin
- The job should automatically move to the “lighting-group”
Result: Any job starting with “light_” now automatically goes to the lighting group!
Common Filter Configurations
Configuration 1: Arnold GPU Requirements
Automatically configure Arnold renders with GPU tags and high memory:
Filter Properties:
- Name:
Arnold GPU Configuration - Type:
MATCH_ALL - Order:
20
Matchers:
Subject: SERVICE_NAME
Type: IS
Input: arnold
Actions:
SET_ALL_RENDER_LAYER_TAGS→gpu,arnold_licenseSET_ALL_RENDER_LAYER_MEMORY→16777216(16GB in KB)SET_MEMORY_OPTIMIZER→true
Configuration 2: Test Job Management
Pause test jobs and set low priority:
Filter Properties:
- Name:
Test Jobs Pause and Deprioritize - Type:
MATCH_ALL - Order:
30
Matchers:
Subject: JOB_NAME
Type: BEGINS_WITH
Input: test_
Actions:
PAUSE_JOB→PauseSET_JOB_PRIORITY→100SET_JOB_MAX_CORES→5.0
Configuration 3: Hero Shot Priority
Give hero shots maximum priority and resources:
Filter Properties:
- Name:
Hero Shots High Priority - Type:
MATCH_ALL - Order:
10
Matchers:
Subject: JOB_NAME
Type: CONTAINS
Input: hero
Actions:
SET_JOB_PRIORITY→900SET_JOB_MIN_CORES→10.0SET_ALL_RENDER_LAYER_MEMORY→16GB (16777216KB)STOP_PROCESSING→ (prevents other filters from modifying)
Configuration 4: User-Based Limits
Limit resource usage for specific users:
Filter Properties:
- Name:
Junior Artist Resource Limits - Type:
MATCH_ALL - Order:
40
Matchers:
Subject: USER
Type: REGEX
Input: junior_.*
Actions:
SET_JOB_MAX_CORES→10.0SET_ALL_RENDER_LAYER_MEMORY→4GB (4194304KB)
Configuration 5: Multi-Layer Pipeline Jobs
Configure different layer types with appropriate resources:
Filter Properties:
- Name:
Pipeline Multi-Layer Configuration - Type:
MATCH_ALL - Order:
25
Matchers:
Subject: JOB_NAME
Type: CONTAINS
Input: _pipeline_
Actions:
SET_ALL_PRE_LAYER_MIN_CORES→2.0SET_ALL_PRE_LAYER_MAX_CORES→4.0SET_ALL_PRE_LAYER_TAGS→fast_cpuSET_ALL_UTIL_LAYER_MEMORY→8388608(8GB)SET_ALL_UTIL_LAYER_TAGS→fast_storageSET_ALL_RENDER_LAYER_MIN_CORES→8.0SET_ALL_RENDER_LAYER_TAGS→gpu
Working with Matchers
Match Types Explained
CONTAINS
Matches if the text appears anywhere in the subject:
Subject: JOB_NAME
Type: CONTAINS
Input: render

Matches: "light_render_v01", "my_render_test", "render"
Doesn't Match: "light_v01", "comp_final"
BEGINS_WITH
Matches if the subject starts with the text:
Subject: JOB_NAME
Type: BEGINS_WITH
Input: comp_

Matches: "comp_shot_010", "comp_final_v02"
Doesn't Match: "light_comp_v01", "final_comp"
ENDS_WITH
Matches if the subject ends with the text:
Subject: JOB_NAME
Type: ENDS_WITH
Input: _final

Matches: "render_final", "comp_shot_final"
Doesn't Match: "final_render", "comp_final_v01"
IS
Matches only exact strings:
Subject: SHOW
Type: IS
Input: demo-project

Matches: "demo-project"
Doesn't Match: "demo-project-2", "new-demo-project"
REGEX
Advanced pattern matching using regular expressions:
Subject: JOB_NAME
Type: REGEX
Input: ^(light|comp)_shot_\d{3}$

Matches: "light_shot_001", "comp_shot_123"
Doesn't Match: "render_shot_001", "light_shot_1"
Common Regex Patterns:
.*- Match anything^text- Starts with “text”text$- Ends with “text”\d+- One or more digits[abc]- Any of a, b, or c(a|b)- Either a or b
Combining Multiple Matchers
Use MATCH_ALL for AND logic:
Filter Type: MATCH_ALL

Matcher 1: SHOW IS "production-show"
Matcher 2: JOB_NAME BEGINS_WITH "hero_"

Result: Only hero jobs from production-show match
Use MATCH_ANY for OR logic:
Filter Type: MATCH_ANY

Matcher 1: USER IS "artist01"
Matcher 2: USER IS "artist02"

Result: Jobs from either artist01 OR artist02 match
Working with Actions
Memory Values
Memory is specified in kilobytes (KB). Use these conversions:
| Size | Kilobytes | Value to Enter |
|---|---|---|
| 1 GB | 1,048,576 | 1048576 |
| 2 GB | 2,097,152 | 2097152 |
| 4 GB | 4,194,304 | 4194304 |
| 8 GB | 8,388,608 | 8388608 |
| 16 GB | 16,777,216 | 16777216 |
| 32 GB | 33,554,432 | 33554432 |
| 64 GB | 67,108,864 | 67108864 |
Quick Calculation: GB × 1,048,576 = KB
Example:
Action: SET_ALL_RENDER_LAYER_MEMORY
Value: 8388608  (8 GB)
Core Values
Core counts are floating-point numbers:
1.0  = 1 core
2.0  = 2 cores
0.5  = Half a core
4.0  = 4 cores
10.0 = 10 cores
Example:
Action: SET_JOB_MIN_CORES
Value: 4.0
Tag Values
Tags are comma-separated strings without spaces:
gpu                      (single tag)
gpu,high_memory          (two tags)
gpu,arnold_license,fast_storage  (three tags)
Example:
Action: SET_ALL_RENDER_LAYER_TAGS
Value: gpu,high_memory
Layer-Specific Actions
Choose the right action for each layer type:
Render Layers (primary rendering):
SET_ALL_RENDER_LAYER_TAGSSET_ALL_RENDER_LAYER_MEMORYSET_ALL_RENDER_LAYER_MIN_CORESSET_ALL_RENDER_LAYER_MAX_CORES
Utility Layers (cache, processing):
SET_ALL_UTIL_LAYER_TAGSSET_ALL_UTIL_LAYER_MEMORYSET_ALL_UTIL_LAYER_MIN_CORESSET_ALL_UTIL_LAYER_MAX_CORES
Pre-Processing Layers (validation, setup):
SET_ALL_PRE_LAYER_TAGSSET_ALL_PRE_LAYER_MEMORYSET_ALL_PRE_LAYER_MIN_CORESSET_ALL_PRE_LAYER_MAX_CORES
Managing Filters
Editing Existing Filters
- Select filter in the list
- Click Edit Filter button
- Modify properties
- Click OK to save
Editable Properties:
- Filter name
- Filter type (MATCH_ALL/MATCH_ANY)
- Order number
- Enabled status
Modifying Matchers
- Select filter
- Select matcher in matcher list
- Click Edit Matcher
- Update subject, type, or input
- Click OK
Or Delete:
- Select matcher
- Click Delete Matcher
Modifying Actions
- Select filter
- Select action in action list
- Click Edit Action
- Update action type or value
- Click OK
Or Delete:
- Select action
- Click Delete Action
Reordering Filters
Method 1: Edit Order Number
- Select filter
- Click Edit Filter
- Change order number
- Click OK
Method 2: Drag and Drop (if supported)
- Click and hold filter
- Drag to new position
- Release to set order
Best Practice: Leave gaps in numbering (10, 20, 30) to allow inserting filters later.
Enabling/Disabling Filters
Temporary Disable:
- Select filter
- Uncheck Enabled checkbox
- Filter stops executing but remains configured
Re-enable:
- Select filter
- Check Enabled checkbox
Deleting Filters
- Select filter
- Click Delete Filter button
- Confirm deletion
Warning: Deletion is permanent. Consider disabling instead if you might need the filter later.
Testing Filters
Method 1: Test Jobs
- Create filter configuration
- Submit a test job that should match
- Monitor the job in CueGUI
- Verify expected configuration applied
Example:
# Submit test job
outline submit test_filter_check.outline

# In CueGUI, check:
# - Job group assignment
# - Job priority
# - Layer memory settings
# - Layer tags
Method 2: Filter Logs
Check Cuebot logs for filter execution:
# View Cuebot logs
tail -f /var/log/cuebot/cuebot.log | grep -i filter

# Look for:
# - Filter execution messages
# - Matcher evaluation results
# - Action application logs
Method 3: Dry Run
Some environments support dry-run mode:
# Using Python API
import opencue

# Load filter
filter = opencue.api.findFilter("show01", "My Test Filter")

# Test against job
job = opencue.api.findJob("test_job_001")
# Check if matchers would match (custom implementation)
Troubleshooting
Filter Not Triggering
Problem: Job doesn’t receive expected configuration
Check These:
- Filter Enabled?
- Look at filter list, verify checkbox is checked
- Matchers Correct?
- Double-check match subject, type, and input value
- Test matcher pattern against actual job name
- Job Properties Match?
- Verify job name, show, user match expectations
- Check for typos in matcher input
- Filter Order?
- Ensure earlier filter didn’t use STOP_PROCESSING
- Verify filter order allows execution
- Filter Type?
- MATCH_ALL requires ALL matchers to match
- MATCH_ANY requires ANY matcher to match
Debug Steps:
1. Enable only your filter
2. Submit simple test job
3. Check Cuebot logs for filter evaluation
4. Verify each matcher individually
5. Add actions one at a time
Actions Not Applied
Problem: Filter triggers but actions don’t work
Check These:
- Value Format Correct?
- Memory in kilobytes, not gigabytes
- Cores as float (4.0 not 4)
- Tags without spaces (gpu,fast not gpu, fast)
- Valid Values?
- Core values positive
- Memory values reasonable
- Groups exist for MOVE_JOB_TO_GROUP
- Action Type Correct?
- RENDER vs UTIL vs PRE layer actions
- Job-level vs layer-level actions
Debug Steps:
1. Remove all actions except one
2. Test with single action
3. Verify action value format
4. Add actions back one at a time
5. Check Cuebot logs for errors
Conflicting Filters
Problem: Unexpected job configuration from multiple filters
Solution Strategies:
- Review Filter Order
- Later filters override earlier ones
- Use STOP_PROCESSING to prevent overrides
- Consolidate Filters
- Combine related filters into one
- Reduces conflicts and complexity
- Make Matchers More Specific
- Narrow matcher criteria
- Use MATCH_ALL with multiple matchers
- Use Filter Order Strategically
Order 10: General policy (all jobs)
Order 20: Show-specific (override general)
Order 30: Critical jobs (final override) + STOP_PROCESSING
Performance Issues
Problem: Job submission slows down
Causes:
- Too many active filters
- Complex regex matchers
- Poor filter ordering
Solutions:
- Disable Unused Filters
- Only keep necessary filters enabled
- Optimize Matchers
- Use simple match types when possible
- BEGINS_WITH/ENDS_WITH faster than REGEX
- Cache regex patterns if possible
- Order Optimization
- Put most common matches first
- Use STOP_PROCESSING to short-circuit
- Consolidate Filters
- Combine filters with same matchers
- Reduce total filter count
Best Practices
Naming Conventions
Use clear, descriptive filter names:
Good:
- “Arnold Renders - GPU Required”
- “Hero Shots - High Priority”
- “Test Jobs - Resource Limits”
Bad:
- “Filter 1”
- “My Filter”
- “New Filter (Copy)”
Documentation
Document complex filters:
- Name clearly: Include purpose in name
- Add comments: Use show notes if available
- Team Communication: Share filter changes
- Version Control: Track filter configurations
Testing Strategy
Always test filters before production:
1. Create filter disabled
2. Configure matchers and actions
3. Test with dedicated test jobs
4. Verify configuration applied correctly
5. Enable for production
6. Monitor first few jobs
7. Adjust as needed
Maintenance Schedule
Regular filter maintenance:
Weekly:
- Review filter execution logs
- Check for errors or warnings
Monthly:
- Review all active filters
- Disable unused filters
- Consolidate similar filters
- Update for workflow changes
Quarterly:
- Full filter audit
- Performance review
- Team feedback integration
Advanced Techniques
Regex Power Users
Advanced regex matchers for complex patterns:
Shot Number Patterns:
Subject: JOB_NAME
Type: REGEX
Input: ^[a-z]+_shot_\d{3}_v\d{2}$

Matches: light_shot_001_v01, comp_shot_123_v05
User Groups:
Subject: USER
Type: REGEX
Input: ^(artist01|artist02|artist03)$

Matches: Any of the three specific artists
Version Control:
Subject: JOB_NAME
Type: REGEX
Input: _v\d{2}$

Matches: Jobs ending with version numbers like _v01, _v12
Filter Chains
Create logical filter sequences:
Order 10: "All Jobs Base Config"
├── Matcher: All jobs (.*)
└── Actions: Default settings

Order 20: "Show Override"
├── Matcher: Show = "production-show"
└── Actions: Show-specific settings

Order 30: "Department Override"
├── Matcher: Job name starts with dept prefix
└── Actions: Department settings

Order 40: "Critical Override"
├── Matcher: Job name contains "hero"
├── Actions: Critical job settings
└── STOP_PROCESSING
Dynamic Configuration
Filters based on dynamic job properties:
Priority-Based Resources:
Filter: "High Priority Extra Resources"
├── Matcher: PRIORITY > 800
└── Actions: Increase core/memory allocation
Facility-Based Routing:
Filter: "LA Facility Jobs"
├── Matcher: FACILITY IS "la"
└── Actions: LA-specific tags and groups
Common Scenarios
Scenario 1: New Show Setup
Setting up filters for a new show:
1. Create base show filter (order 20):
   - Matcher: SHOW = "new-show"
   - Actions: Default show settings

2. Create department filters (order 30-35):
   - Lighting: Tags, resources
   - Comp: Tags, resources
   - FX: Tags, resources

3. Create priority filter (order 40):
   - Hero shots: High priority + STOP_PROCESSING
   - Regular: Normal priority
   - Test: Low priority
Scenario 2: Temporary Priority Boost
Temporarily boost specific jobs:
1. Create filter (order 5 - runs first):
   - Name: "TEMP - Client Delivery Boost"
   - Matcher: Job name contains "client_delivery"
   - Actions: Priority 950, min cores 20.0
   - STOP_PROCESSING

2. When delivery complete:
   - Disable the filter
   - Jobs return to normal priority via other filters
Scenario 3: Resource Crisis
Farm at capacity, need to limit resource usage:
1. Create emergency filter (order 1 - highest priority):
   - Name: "EMERGENCY - Resource Limits"
   - Matcher: All jobs (.*)
   - Actions:
     - SET_JOB_MAX_CORES → 20.0
     - SET_ALL_RENDER_LAYER_MEMORY → 8388608

2. When crisis passes:
   - Disable the filter
Integration with Pipeline
Job Submission
Structure job names to trigger filters:
# In submission script
job_name = f"{dept}_{show}_{shot}_{task}_v{version:02d}"

# Examples that trigger filters:
# light_demo_shot01_beauty_v01  -> Lighting filter
# comp_demo_shot01_final_v03    -> Comp filter
# test_demo_shot01_checkrender  -> Test filter
Show Configuration
Store filter configurations in show config:
# show_config.yaml
filters:
  - name: "Demo Show Renders"
    order: 20
    matchers:
      - subject: SHOW
        type: IS
        value: demo-show
    actions:
      - type: SET_ALL_RENDER_LAYER_MEMORY
        value: 16777216
Monitoring
Track filter effectiveness:
# Monitor filter applications
# Check logs for filter execution
# Measure resource utilization by department/show
# Adjust filters based on data
What’s Next?
To learn more about filters:
- Filters and Actions - Concepts: Filters and Actions
- Filter Actions Reference - Reference: Complete filter actions documentation
- Filter Tutorial - Tutorials: Step-by-step filter examples
- Filter Development - Developer Guide: Filter Development
Summary
Key takeaways for using filters:
- Access via CueCommander - Filters plugin in CueGUI
- Matchers define conditions - When filters trigger
- Actions modify jobs - What filters do
- Order matters - Lower numbers run first
- Test thoroughly - Verify before production
- Monitor and adjust - Iterate based on usage
- Document clearly - Help team understand filters
- Use best practices - Naming, organization, maintenance
Filters enable powerful automation for consistent job configuration and resource management across your OpenCue pipeline.