Filter Tutorial
Introduction
This tutorial teaches you how to create and manage OpenCue filters through hands-on examples. You’ll build real-world filter configurations that automate job management, optimize resource allocation, and enforce pipeline policies.
What You’ll Learn
- Creating filters from scratch in CueGUI
- Configuring matchers for different scenarios
- Applying actions to automate job configuration
- Testing and debugging filters
- Building production-ready filter sets
- Troubleshooting common filter issues
Prerequisites
- CueGUI installed and running
- Access to CueCommander filters plugin
- Permission to create and manage filters
- Test jobs for verification
Tutorial Structure
This tutorial is organized into progressive exercises:
- Exercise 1: Simple filter (group assignment)
- Exercise 2: Resource allocation filter
- Exercise 3: Multi-matcher filter (AND logic)
- Exercise 4: Priority management with STOP_PROCESSING
- Exercise 5: Multi-layer job configuration
- Exercise 6: Advanced regex matchers
- Exercise 7: Complete production filter set
Exercise 1: Department Auto-Grouping
Goal: Automatically move lighting jobs to the lighting group.
Scenario: Your facility has separate groups for each department. You want all jobs with names starting with “light_” to automatically go to the “lighting-group”.
Important: Understanding Groups
Groups in OpenCue are organizational folders for tracking jobs. Groups let you organize jobs by:
- Department (lighting-group, fx-group, compositing-group)
- Priority (hero-group, priority-group, background-group)
- Any other category useful for your pipeline
Before creating a filter with MOVE_JOB_TO_GROUP, you must first create the target group.
Step 0: Create the Target Group (Required!)
Before creating the filter, create the “lighting-group”:
- In CueGUI, open CueCommander (Window > Open Windows: CueCommander)
- Select Views/Plugins > OpenCuecommander > Monitor Cue
- In the Show/Root Group tree (top-left), right-click on your show name (e.g., “testing”)
- Select “Create Group…“ from the context menu
- Enter:
lighting-group - Click OK
You should now see “lighting-group” appear as a folder under your show in the tree.
Step 1: Open CueCommander
- Click Window in the menu bar
- Select Open Windows: CueCommander
- The CueCommander window opens
Step 2: Access Filters Plugin
- In CueCommander, locate the plugin panel
- To open the Filters Windows:
- Click Views/Plugins in the menu bar
- Select OpenCuecommander > Monitor Cue
- To open the Filters Windows:
- Click on Filters plugin tab
- The filters management interface displays
- Access Filters
- In CueCommander > Monitor Cue, find the Show (Root Group tree) on the top-left side
- Right-click on a show name (e.g., “testing”, “demo-show”, “production-show”)
- Select “View Filters…” from the context menu
- Filter Dialog Opens
- You’ll see a dialog titled “Filters for: [show-name]”
- The interface has three main sections:
- Left: Filter list
- Top right: Matchers
- Bottom right: Actions
Interface Components:
- Filter List (left): Shows all configured filters
- Matchers (top right): Conditions for filter
- Actions (bottom right): Operations to execute
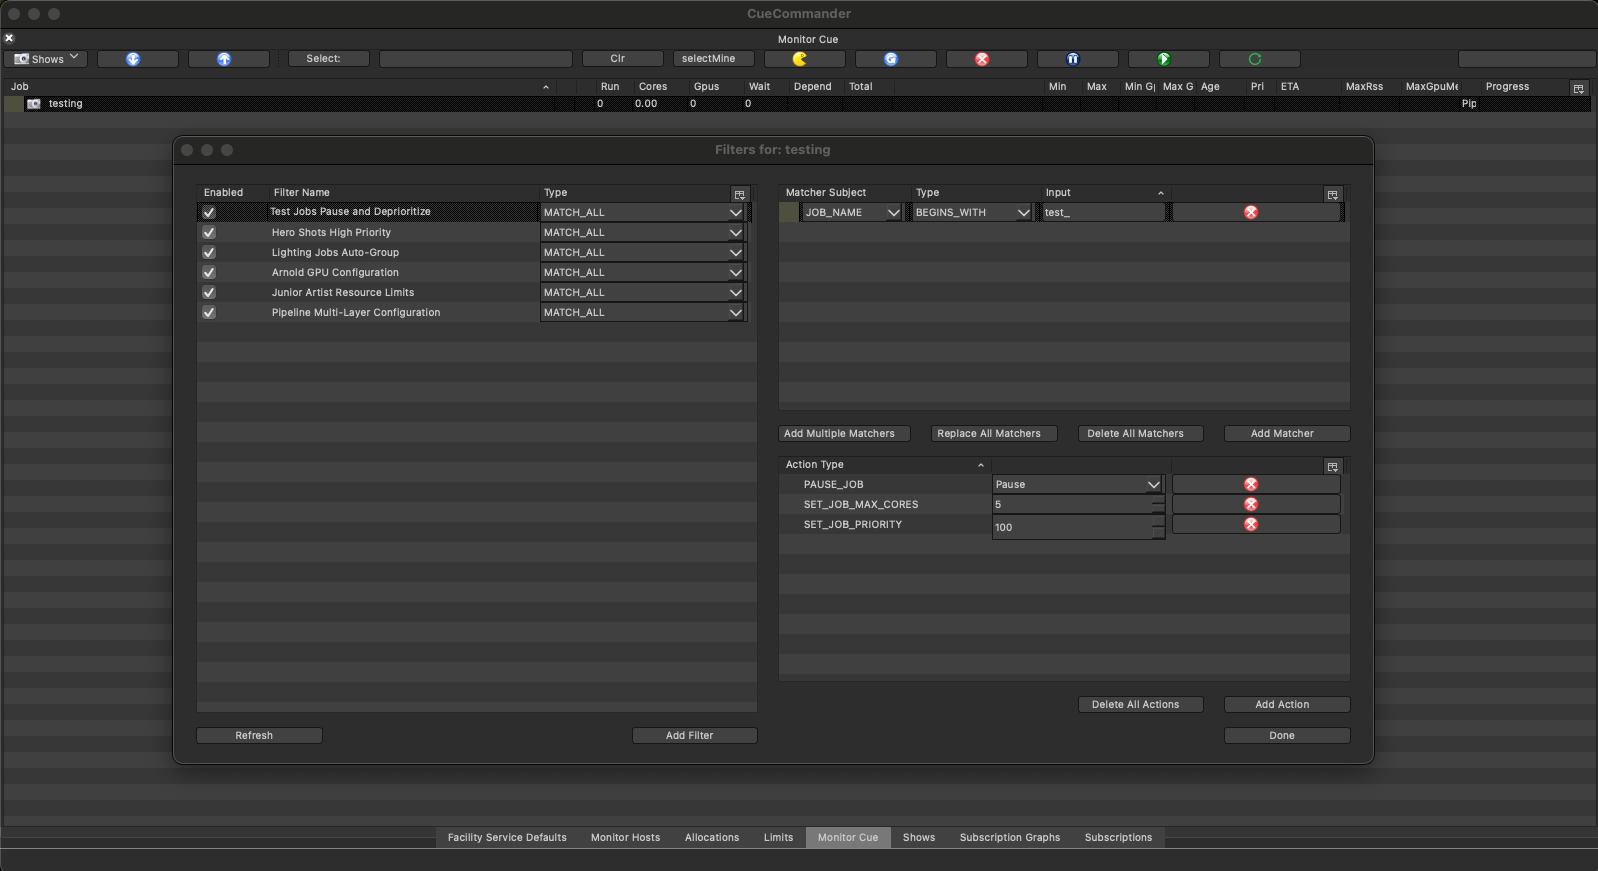
Figure: The Filters management interface showing several configured filters. The “Test Jobs Pause and Deprioritize” filter is selected, demonstrating a matcher (JOB_NAME BEGINS_WITH “test_”) and three actions (PAUSE_JOB, SET_JOB_MAX_CORES, SET_JOB_PRIORITY). This is the interface you’ll use throughout this tutorial.
Step 3: Create the Filter
- Click Create Filter button
- Fill in the dialog:
Name: Department - Lighting Auto-Group
Type: MATCH_ALL
Order: 10
Enabled: ✓ (checked)
- Click OK
What we did: Created a filter that will run early (order 10) and will require all matchers to match (MATCH_ALL).
Step 4: Add the Matcher
- Select your new filter in the list
- Click Add Matcher button
- Configure matcher:
Subject: JOB_NAME
Type: BEGINS_WITH
Input: light_
- Click OK
What this does: Matches any job whose name starts with “light_” (like “light_shot_001”).
Step 5: Add the Action
- With filter still selected, click Add Action
- Configure action:
Type: MOVE_JOB_TO_GROUP
Value: lighting-group
- Click OK
What this does: Moves matched jobs to the “lighting-group” folder (which we created in Step 0).
Step 6: Test the Filter
Option A: Submit a real job
- Name: light_test_001
- 10 frames
Step 7: Verify
Check in CueGUI Monitor Jobs:
- Look for your test job
- Check its group assignment
- It should be in “lighting-group”
Success! Your first filter is working.
Exercise 2: GPU Requirements for Arnold
Goal: Automatically configure Arnold renders with GPU tags and high memory.
Scenario: All Arnold renders need GPU hosts and 12GB of memory minimum. Instead of manually configuring each job, create a filter to do it automatically.
Step 1: Create the Filter
Name: Renderer - Arnold GPU Config
Type: MATCH_ALL
Order: 20
Enabled: ✓
Step 2: Add Service Matcher
Subject: SERVICE_NAME
Type: IS
Input: arnold
Why IS instead of CONTAINS? Exact match prevents matching “arnold_test” when you only want “arnold”.
Step 3: Add Multiple Actions
Add three actions to this filter:
Action 1: GPU Tags
Type: SET_ALL_RENDER_LAYER_TAGS
Value: gpu,arnold_license
Action 2: Memory Requirement
Type: SET_ALL_RENDER_LAYER_MEMORY
Value: 12582912
Calculation: 12 GB × 1,048,576 = 12,582,912 KB
Action 3: Memory Optimizer
Type: SET_MEMORY_OPTIMIZER
Value: true
Step 4: Test
- Submit (or find) an Arnold render job
- Check job properties
- Verify render layers have:
- Tags:
gpu,arnold_license - Memory: 12GB minimum
- Memory optimizer enabled
- Tags:
Result: All Arnold jobs automatically get GPU configuration!
Exercise 3: Hero Shot Priority (Multi-Matcher)
Goal: Give high priority to hero shots from the production show only.
Scenario: Hero shots are critical and need priority, but only for the production show. Test show hero shots should not get the boost.
Step 1: Create the Filter
Name: Priority - Production Hero Shots
Type: MATCH_ALL
Order: 15
Enabled: ✓
Note: Using MATCH_ALL means BOTH matchers must match.
Step 2: Add First Matcher (Show)
Subject: SHOW
Type: IS
Input: production-show
Step 3: Add Second Matcher (Hero Jobs)
Subject: JOB_NAME
Type: CONTAINS
Input: hero
Step 4: Add Priority Actions
Action 1: Set High Priority
Type: SET_JOB_PRIORITY
Value: 900
Action 2: Ensure Resources
Type: SET_JOB_MIN_CORES
Value: 10.0
Step 5: Test Matrix
Create test scenarios:
| Job Name | Show | Should Match? |
|---|---|---|
| hero_shot_001 | production-show | ✓ YES |
| hero_shot_001 | test-show | ✗ NO |
| regular_shot_001 | production-show | ✗ NO |
| regular_shot_001 | test-show | ✗ NO |
Why? Both matchers must match (MATCH_ALL logic).
Result: Only production show hero shots get the priority boost!
Exercise 4: Stop Processing for Critical Jobs
Goal: Prevent other filters from modifying critical client delivery jobs.
Scenario: Client delivery jobs need specific settings and shouldn’t be modified by later filters. Use STOP_PROCESSING to prevent interference.
Step 1: Create High-Priority Filter
Name: Critical - Client Deliveries
Type: MATCH_ALL
Order: 5
Enabled: ✓
Note: Order 5 is very early, before most other filters.
Step 2: Add Matcher
Subject: JOB_NAME
Type: CONTAINS
Input: client_delivery
Step 3: Add Configuration Actions
Action 1: Maximum Priority
Type: SET_JOB_PRIORITY
Value: 1000
Action 2: Guaranteed Resources
Type: SET_JOB_MIN_CORES
Value: 20.0
Action 3: High Memory
Type: SET_ALL_RENDER_LAYER_MEMORY
Value: 16777216
Action 4: STOP PROCESSING
Type: STOP_PROCESSING
Value: (no value needed)
Step 4: Understanding STOP_PROCESSING
Without STOP_PROCESSING:
Order 5:  Client delivery → Priority 1000
Order 20: All jobs → Priority 500 (OVERWRITES to 500!)
Result: Client delivery has priority 500 ❌
With STOP_PROCESSING:
Order 5:  Client delivery → Priority 1000 → STOP
Order 20: Skipped for this job
Result: Client delivery keeps priority 1000 ✓
Step 5: Test
- Submit job named “client_delivery_final”
- Verify priority is 1000
- Check that later filters didn’t override settings
Result: Critical jobs protected from modification!
Exercise 5: Multi-Layer Pipeline Configuration
Goal: Configure pre-processing, utility, and render layers with different resource requirements.
Scenario: Your pipeline jobs have three layer types with different needs:
- Pre layers: Fast CPU for validation (2 cores max)
- Util layers: Fast storage for cache (8GB memory)
- Render layers: GPU for rendering (16 cores min)
Step 1: Create the Filter
Name: Pipeline - Multi-Layer Config
Type: MATCH_ALL
Order: 25
Enabled: ✓
Step 2: Add Matcher
Subject: JOB_NAME
Type: CONTAINS
Input: _pipeline_
Example matches: “shot_001_pipeline_v01”, “asset_pipeline_cache”
Step 3: Configure Pre-Processing Layers
Action 1: Pre Layer Core Limits
Type: SET_ALL_PRE_LAYER_MIN_CORES
Value: 1.0
Action 2: Pre Layer Max Cores
Type: SET_ALL_PRE_LAYER_MAX_CORES
Value: 2.0
Action 3: Pre Layer Tags
Type: SET_ALL_PRE_LAYER_TAGS
Value: fast_cpu
Why limit pre-processing? Validation is quick and doesn’t need many cores. This saves resources for rendering.
Step 4: Configure Utility Layers
Action 4: Util Layer Memory
Type: SET_ALL_UTIL_LAYER_MEMORY
Value: 8388608
Calculation: 8 GB × 1,048,576 = 8,388,608 KB
Action 5: Util Layer Tags
Type: SET_ALL_UTIL_LAYER_TAGS
Value: fast_storage
Why? Cache generation needs fast disk I/O.
Step 5: Configure Render Layers
Action 6: Render Layer Min Cores
Type: SET_ALL_RENDER_LAYER_MIN_CORES
Value: 16.0
Action 7: Render Layer Tags
Type: SET_ALL_RENDER_LAYER_TAGS
Value: gpu,high_memory
Why high cores? Rendering is compute-intensive and benefits from parallel processing.
Step 6: Test with Multi-Layer Job
Create or find a job with all three layer types:
Job: shot_001_pipeline_v01
├── pre_validate (PRE layer)
│   Expected: 1-2 cores, fast_cpu tag
├── util_cache (UTIL layer)
│   Expected: 8GB memory, fast_storage tag
└── render_beauty (RENDER layer)
    Expected: 16+ cores, gpu tag
Verify each layer type got appropriate configuration.
Result: Different layer types automatically get appropriate resources!
Exercise 6: Advanced Regex Matchers
Goal: Use regex patterns for complex job matching.
Scenario: You need to match jobs following specific naming conventions:
- Format:
{dept}_{show}_{shot}_{version} - Departments: light, comp, fx
- Shots: Three digits (001-999)
- Versions: v01, v02, etc.
Step 1: Create the Filter
Name: Advanced - Production Job Pattern
Type: MATCH_ALL
Order: 30
Enabled: ✓
Step 2: Add Regex Matcher
Subject: JOB_NAME
Type: REGEX
Input: ^(light|comp|fx)_[a-zA-Z0-9]+_\d{3}_v\d{2}$
Pattern Breakdown:
^- Start of string(light|comp|fx)- One of these departments_- Literal underscore[a-zA-Z0-9]+- Show name (letters/numbers)_\d{3}_- Three-digit shot numberv\d{2}- Version (v01, v02, etc.)$- End of string
Step 3: Add Show Matcher
Subject: SHOW
Type: REGEX
Input: ^prod-.*
Matches shows: prod-feature, prod-series, prod-commercial
Step 4: Add Actions
Type: SET_JOB_PRIORITY
Value: 700
Step 5: Test Pattern Matching
| Job Name | Show | Match? |
|---|---|---|
| light_demo_001_v01 | prod-feature | ✓ YES |
| comp_demo_123_v05 | prod-series | ✓ YES |
| fx_demo_001_v1 | prod-feature | ✗ NO (version must be v01) |
| render_demo_001_v01 | prod-feature | ✗ NO (dept must be light/comp/fx) |
| light_demo_001_v01 | test-show | ✗ NO (show must start with prod-) |
Step 6: Regex Testing Tips
Before adding to filter, test your regex:
Online Tools:
- regex101.com
- regexr.com
Python Testing:
import re
pattern = r'^(light|comp|fx)_[a-zA-Z0-9]+_\d{3}_v\d{2}$'
test_names = [
    'light_demo_001_v01',  # Should match
    'render_demo_001_v01',  # Should not match
]
for name in test_names:
    if re.match(pattern, name):
        print(f"✓ {name}")
    else:
        print(f"✗ {name}")
Result: Complex naming conventions handled with precision!
Exercise 7: Complete Production Filter Set
Goal: Build a complete filter set for a production environment.
Scenario: Set up filters for a full production show with departments, priorities, and resource management.
Filter Set Overview
Order 5:  Client Deliveries (STOP)
Order 10: Department Grouping
Order 15: Test Job Limits
Order 20: Renderer-Specific Config
Order 25: Hero Shot Priority
Order 30: Default Show Settings
Filter 1: Client Deliveries (Order 5)
Highest priority, stops processing:
Name: Critical - Client Deliveries
Order: 5
Matcher: JOB_NAME CONTAINS "client_delivery"
Actions:
  - SET_JOB_PRIORITY → 1000
  - SET_JOB_MIN_CORES → 20.0
  - SET_ALL_RENDER_LAYER_MEMORY → 16777216
  - STOP_PROCESSING
Filter 2: Lighting Department (Order 10)
Note: Create “lighting-group” first (Right-click show > Create Group)
Name: Department - Lighting
Order: 10
Matcher: JOB_NAME BEGINS_WITH "light_"
Actions:
  - MOVE_JOB_TO_GROUP → "lighting-group"
  - SET_ALL_RENDER_LAYER_TAGS → "gpu"
Filter 3: Compositing Department (Order 10)
Note: Create “compositing-group” first (Right-click show > Create Group)
Name: Department - Compositing
Order: 10
Matcher: JOB_NAME BEGINS_WITH "comp_"
Actions:
  - MOVE_JOB_TO_GROUP → "compositing-group"
  - SET_ALL_RENDER_LAYER_MEMORY → 8388608
Filter 4: Test Jobs (Order 15)
Name: Test - Resource Limits
Order: 15
Matcher: JOB_NAME BEGINS_WITH "test_"
Actions:
  - PAUSE_JOB → true
  - SET_JOB_PRIORITY → 50
  - SET_JOB_MAX_CORES → 5.0
  - SET_ALL_RENDER_LAYER_MEMORY → 4194304
Filter 5: Arnold Renderer (Order 20)
Name: Renderer - Arnold
Order: 20
Matchers:
  - SERVICE_NAME IS "arnold"
Actions:
  - SET_ALL_RENDER_LAYER_TAGS → "gpu,arnold_license"
  - SET_ALL_RENDER_LAYER_MEMORY → 12582912
  - SET_MEMORY_OPTIMIZER → true
Filter 6: Hero Shots (Order 25)
Name: Priority - Hero Shots
Order: 25
Matchers:
  - SHOW IS "production-show"
  - JOB_NAME CONTAINS "hero"
Actions:
  - SET_JOB_PRIORITY → 900
  - SET_JOB_MIN_CORES → 10.0
  - STOP_PROCESSING
Filter 7: Default Show Settings (Order 30)
Name: Default - Production Show
Order: 30
Matcher: SHOW IS "production-show"
Actions:
  - SET_JOB_PRIORITY → 500
  - SET_JOB_MIN_CORES → 2.0
  - SET_JOB_MAX_CORES → 50.0
Implementation Order
Implement filters in this order:
- Create all filters (disabled)
- Test each filter individually with disabled others
- Enable in order: 5, 10, 15, 20, 25, 30
- Test complete set with various job types
- Monitor production for first few days
- Adjust as needed based on feedback
Test Matrix
Create comprehensive tests:
| Job Name | Show | Service | Expected Result |
|---|---|---|---|
| client_delivery_final | production-show | arnold | Priority 1000, 20 cores, 16GB, GPU tags, STOPPED |
| light_shot_001_v01 | production-show | arnold | Lighting group, Priority 500, GPU tags, 12GB |
| comp_shot_002_v01 | production-show | nuke | Comp group, Priority 500, 8GB |
| test_render_check | production-show | arnold | Paused, Priority 50, 5 cores max, 4GB |
| light_hero_001_v01 | production-show | arnold | Lighting group, Priority 900, 10 cores min, GPU, STOPPED |
Verification Checklist
For each test job:
- Correct group assignment
- Expected priority value
- Core limits applied
- Memory settings correct
- Tags applied to layers
- STOP_PROCESSING worked (check logs)
Result: Complete production filter automation system!
Debugging Exercise
Scenario: A filter isn’t working as expected. Let’s debug it.
Problem: Jobs Not Moving to Group
Filter Configuration:
Name: Department - FX
Matcher: JOB_NAME CONTAINS "fx"
Action: MOVE_JOB_TO_GROUP → "fx-group"
Problem: Jobs named “fx_shot_001” are not moving to fx-group.
Debug Steps
Step 1: Verify Filter Enabled
Check: Filter list → "Department - FX" → Enabled checkbox
Status: ✓ Checked
Result: Not the issue
Step 2: Check Matcher
Current: JOB_NAME CONTAINS "fx"
Test: Does "fx_shot_001" contain "fx"?
Result: ✓ Yes, should match
Step 3: Check Action
Type: MOVE_JOB_TO_GROUP
Value: "fx-group"
Question: Does "fx-group" exist?
Step 4: Verify Group Exists
Check if the group exists:
- In CueGUI > CueCommander > Monitor Cue
- Look at the Show/Root Group tree
- Check if “fx-group” appears under the show
Finding: Group “fx-group” doesn’t exist!
Solution
Option 1: Create the Group (Recommended)
- In CueCommander > Monitor Cue
- Right-click on the show name
- Select “Create Group…“
- Enter:
fx-group - Click OK
- Test filter again
Option 2: Use Existing Group
- Find an available group in the tree (e.g., “general” or “lighting-group”)
- Edit the filter action
- Update action value to the existing group name
- Test filter again
Result: Jobs now moving to group successfully!
Debugging Checklist
When filters don’t work:
- Filter enabled? Check checkbox
- Matchers correct? Verify subject/type/input
- Job matches? Test job name against matcher
- Action values valid? Check groups exist, memory in KB, etc.
- Filter order? Check STOP_PROCESSING didn’t skip
- Logs? Check Cuebot logs for errors
Best Practices Learned
From Exercise 1 (Grouping)
- Use BEGINS_WITH for department prefixes
- Order 10-20 for organizational filters
- Test with actual job names
From Exercise 2 (Resources)
- Multiple actions in single filter is OK
- Layer-specific actions for layer-specific needs
From Exercise 3 (Multi-Matcher)
- MATCH_ALL = AND logic (all must match)
- Combine show + name for precision
- Test all combinations
From Exercise 4 (Stop Processing)
- STOP_PROCESSING prevents overrides
- Use low order numbers for STOP filters
- Critical settings should STOP
From Exercise 5 (Multi-Layer)
- Different layer types need different resources
- Pre layers: minimal resources
- Util layers: storage/memory
- Render layers: maximum compute
From Exercise 6 (Regex)
- Test regex before adding to filter
- Use online tools for pattern testing
- Document complex patterns
From Exercise 7 (Production Set)
- Implement incrementally
- Test each filter individually
- Order matters: critical → specific → general
- Monitor after deployment
Common Mistakes and Solutions
Mistake 1: Cores as Integer Instead of Float
Wrong:
Type: SET_JOB_MIN_CORES
Value: 4  ❌ (might work but inconsistent)
Correct:
Type: SET_JOB_MIN_CORES
Value: 4.0  ✓ (proper float format)
Fix: Always use decimal notation (1.0, 2.0, 4.0)
Mistake 2: Tags with Spaces
Wrong:
Type: SET_ALL_RENDER_LAYER_TAGS
Value: gpu, high_memory  ❌ (space after comma)
Correct:
Type: SET_ALL_RENDER_LAYER_TAGS
Value: gpu,high_memory  ✓ (no spaces)
Fix: Remove all spaces from tag strings
Mistake 3: Wrong Layer Action Type
Wrong:
# Trying to configure utility layers
Type: SET_ALL_RENDER_LAYER_TAGS  ❌ (wrong layer type!)
Correct:
# For utility layers, use UTIL actions
Type: SET_ALL_UTIL_LAYER_TAGS  ✓
Fix: Match action type to layer type (RENDER/UTIL/PRE)
Mistake 4: Filter Order Conflicts
Wrong:
Order 10: All jobs → Priority 500
Order 20: Hero jobs → Priority 900
Result: Hero jobs get 900 but might be overridden later
Correct:
Order 10: All jobs → Priority 500
Order 20: Hero jobs → Priority 900 + STOP_PROCESSING
Result: Hero jobs keep 900, other filters skipped
Fix: Use STOP_PROCESSING to protect critical settings
Next Steps
You’ve completed the filter tutorial! You now know how to:
- Create filters with matchers and actions
- Configure resource allocation
- Use STOP_PROCESSING effectively
- Handle multi-layer jobs
- Write regex patterns
- Build production filter sets
- Debug filter issues
Continue Learning:
- Filters and Actions - Concepts: Filters and Actions
- Using Filters User Guide - User Guides: Practical filter usage
- Filter Actions Reference - Reference: Complete filter actions documentation
- Filter Development - Developer Guide: Filter Development
Practice Projects:
- Build your facility’s filter set - Apply what you learned to your environment
- Optimize existing filters - Review and improve current configurations
- Document your filters - Create team documentation for your filter strategy
Cheat Sheet
Quick Reference
Match Types:
CONTAINS- Anywhere in textBEGINS_WITH- Start of textENDS_WITH- End of textIS- Exact matchREGEX- Pattern match
Common Actions:
- Group:
MOVE_JOB_TO_GROUP - Priority:
SET_JOB_PRIORITY - Cores:
SET_JOB_MIN_CORES/SET_JOB_MAX_CORES - Tags:
SET_ALL_RENDER_LAYER_TAGS - Memory:
SET_ALL_RENDER_LAYER_MEMORY - Stop:
STOP_PROCESSING
Layer Types:
RENDER- Primary renderingUTIL- Utilities/processingPRE- Pre-processing/validation
Congratulations on completing the filter tutorial!